Installation
Install the model-agnostic geoxplain package to inspect arrays and compatible result bundles. Model backends are separate packages and are only needed when this machine must submit or execute explanation computations.
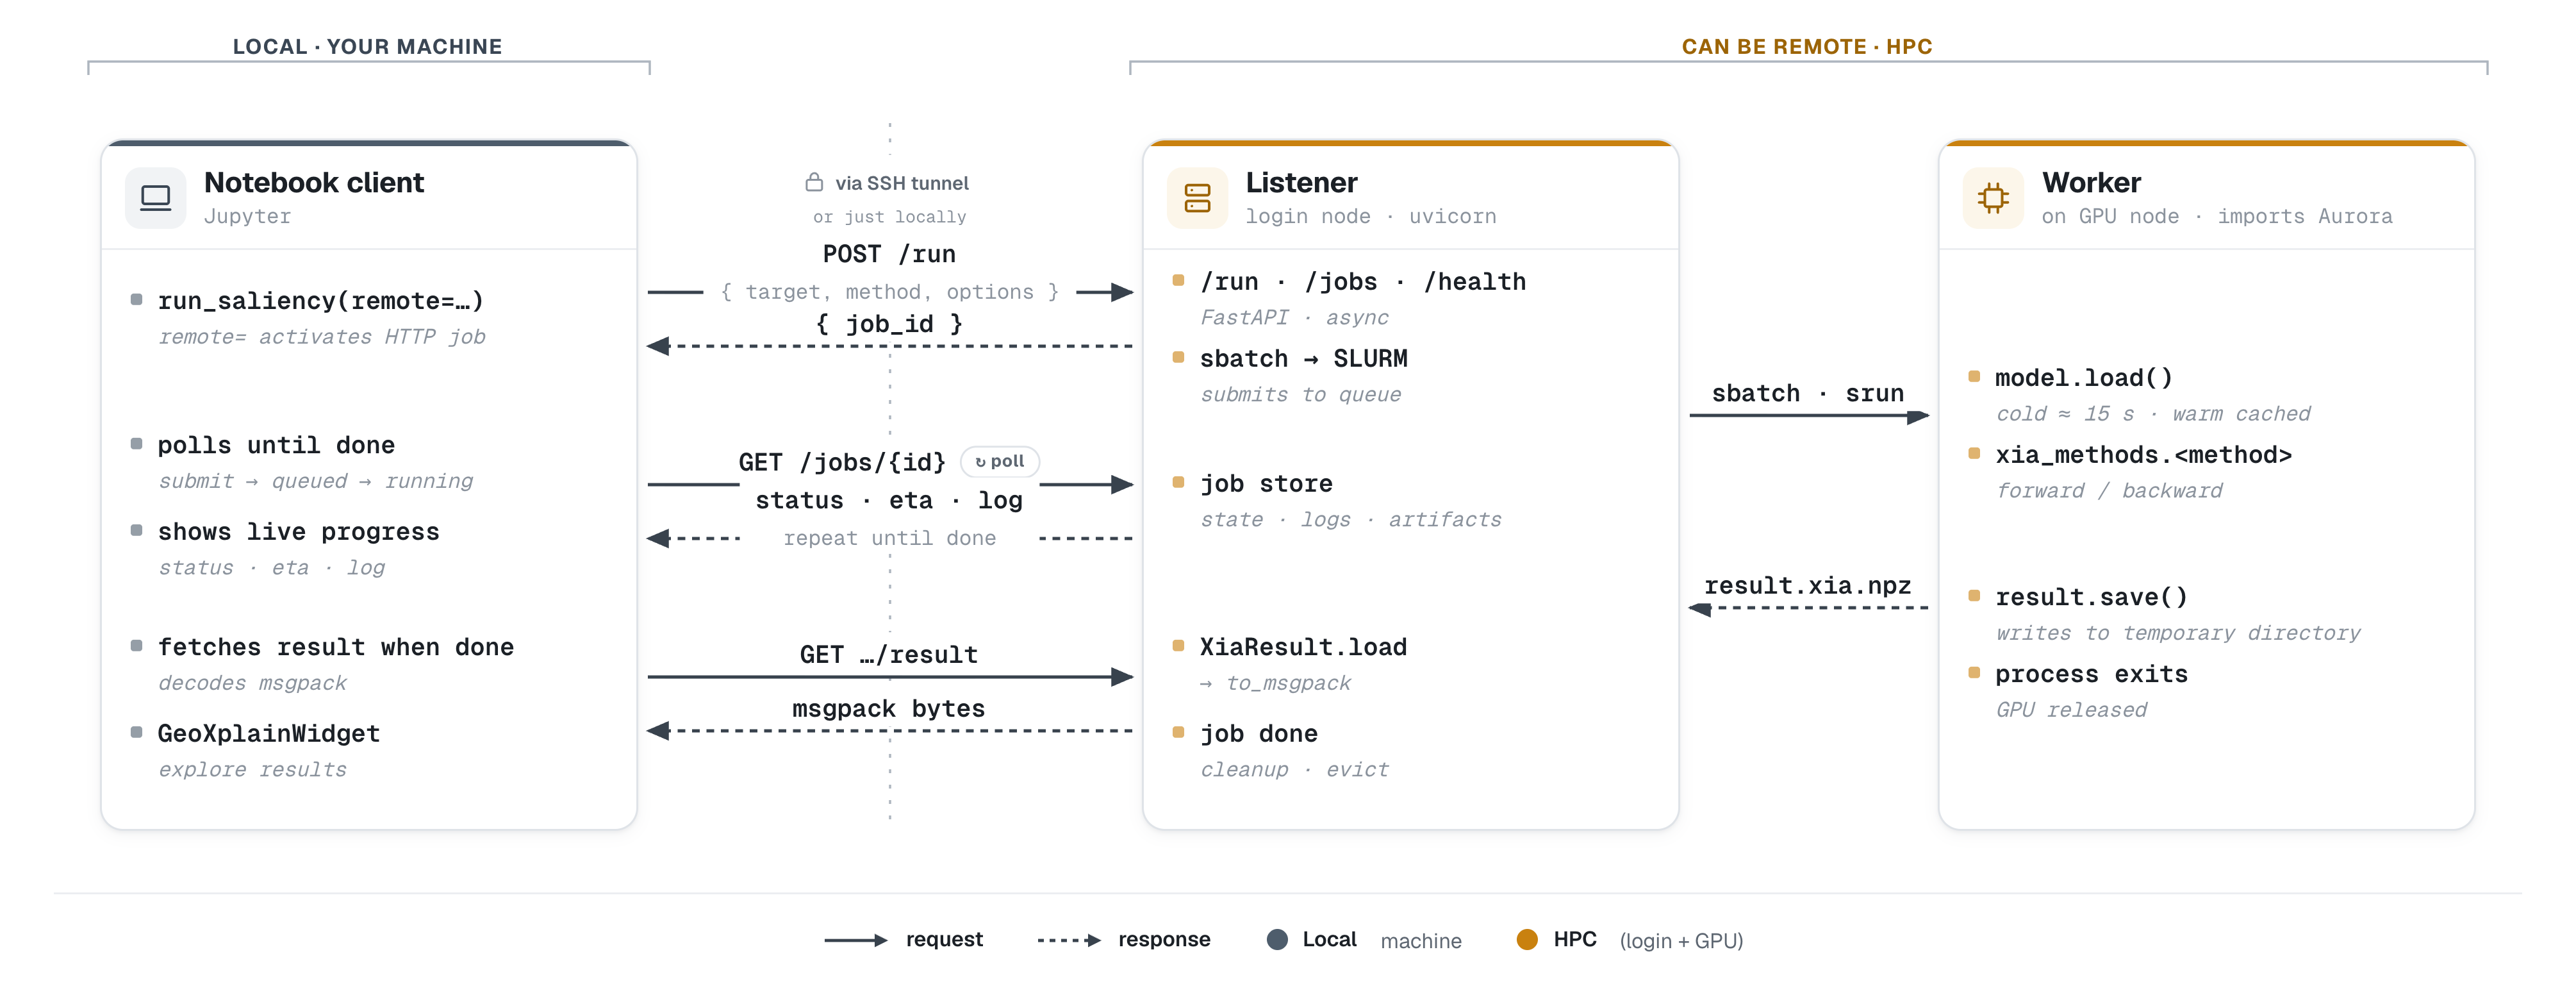
The Aurora backend splits into roles that can live on different machines, and each installs a different set of extras. A notebook client (left) that only submits work needs just [client]; a login-node listener needs [server]; the GPU worker that runs Aurora needs [gpu]. The model-agnostic GeoXplain viewer itself needs none of these — install the backend only where computation actually happens.
Install the GeoXplain viewer
The core viewer is on PyPI. For most users a plain install is all you need:
Screenshot capture uses Playwright and is an optional package extra. Install it and its browser when you want GeoXplain.screenshot() or GeoXplainWidget.screenshot():
From a source checkout
Working from a clone of the GeoXplain repository instead, use uv:
uv sync                       # core viewer
uv sync --extra screenshots   # add the screenshot extra
uv run playwright install chromium
pip install -e . (optionally -e '.[screenshots]') is the plain-pip equivalent.
Optional: Aurora backend
geoxplain-aurora-adapter is the first packaged model backend. Install it when you want to compute explanations for Microsoft Aurora or pull ERA5 overlays through its data pipeline. It is not required to use the GeoXplain viewer.
Run the setup guide
A plain package install is enough to run the interactive setup. From PyPI:
From a source checkout, install it editable first:
The setup command asks for a deployment profile, writes only the config that profile needs, and prints the exact pip install command to run on each machine. Jump straight to one profile with a flag:
| Profile | Purpose | Setup flag |
|---|---|---|
client |
Submit requests to an existing listener. | setup --client |
local |
Compute in a notebook process with a visible GPU. | setup --local |
gpu-listener |
Run the HTTP listener inside an existing GPU allocation. | setup --gpu-listener |
login-node |
Run a login-node listener backed by SLURM jobs. | setup --login-node |
Install the right extras
The setup guide prints these for you, but the mapping is fixed. Install only the extras a machine's role needs:
| Extras | Install on | Pulls in |
|---|---|---|
[client] |
A machine that only submits requests | httpx, msgpack (no Torch, no FastAPI) |
[server] |
A host that runs the listener | fastapi, uvicorn, plus the zarr/GCS read stack (no Torch) |
[gpu] |
A host that runs Aurora compute | microsoft-aurora, torch, xarray, zarr, and science helpers |
[all] |
Everything | gpu, server, and client combined |
Common deployments map cleanly onto the profiles above:
| Deployment | Install |
|---|---|
| Client-only laptop or login shell | pip install 'geoxplain-aurora-adapter[client]' |
| Notebook directly on a GPU node | pip install 'geoxplain-aurora-adapter[gpu]' |
| GPU listener inside a GPU allocation | pip install 'geoxplain-aurora-adapter[gpu,server]' |
| SLURM login-node listener | login node: pip install 'geoxplain-aurora-adapter[server]' · GPU worker: pip install 'geoxplain-aurora-adapter[gpu,server,client]' |
Editable installs from a clone use the same extras, e.g. pip install -e '.[gpu,server]'. uv pip install accepts the identical extras strings.
Setup writes its config to ~/.config/geoxplain-aurora-adapter/listen.toml; pass --config <path> to use another location, or setup --reset to replace an existing config. See run remotely for starting a listener and the full requirements list in the adapter's own installation notes.
Documentation dependencies
The documentation toolchain lives in uv's dev dependency group:
The documentation site includes a separately labeled Aurora backend section and reads its API reference from the sibling source at ../geoxplain-aurora-adapter. See documentation development for the expected checkout layout and strict build command.